可以免費申請 SSL 憑證。
把在Linux 上手動申請的方法紀錄下來,
除了可以在 Linux 本機申請使用,
也可以幫別台電腦申請憑證。
如果使用在別台電腦,
每90天到期前要手動將更新的憑證複製到使用的電腦。
申請完會拿到這裡說的4個檔案:
https://certbot.eff.org/docs/using.html#where-are-my-certificates
privkey.pem
cert.pem
chain.pem
fullchain.pem
文章裡有說明分別對應 Apache 和 Nginx 中的設定項目。
自動申請程式 certbot 的安裝方式,
除了 certbot 上的方式外,
Arch linux 也有 package
certbot
開始:
# sudo certbot certonly --email xxxxxx@gmail.com --manual
在申請時不會寄任何資料到電子信箱
說明是寫 email 可以用來恢復憑證之類的。
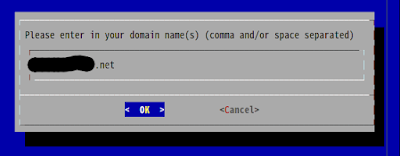
第一個畫面是需要輸入要使用憑證的網站的網址,
可以用空白分或逗號分開多的網站網址,
一次申請好幾個,
不同網站的憑證會分別放在各自的資料夾內。

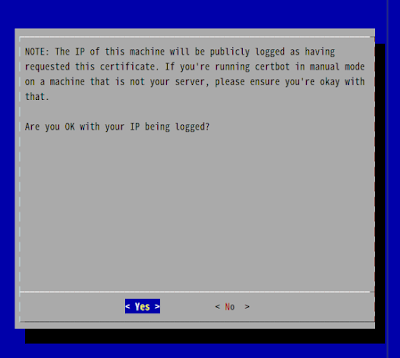
接著說明會紀錄申請的電腦IP
接著會有手動驗證說明,
以下是內容。
- Make sure your web server displays the following content at
- http://www.my-server.net/.well-known/acme-challenge/AAAABBCCCCCCCDDDDDDDEEEEEEFFFFFFGGGGG before continuing:
- AAAABBCCCCCCCDDDDDDDEEEEEEFFFFFFGGGGG.XXXXXXXXXXXXXXXXXYYYYYYYYYYYYYYYZZZZZZ
- If you don't have HTTP server configured, you can run the following
- command on the target server (as root):
- mkdir -p /tmp/certbot/public_html/.well-known/acme-challenge
- cd /tmp/certbot/public_html
- printf "%s" AAAABBCCCCCCCDDDDDDDEEEEEEFFFFFFGGGGG.XXXXXXXXXXXXXXXXXYYYYYYYYYYYYYYYZZZZZZ > .well-known/acme-challenge/AAAABBCCCCCCCDDDDDDDEEEEEEFFFFFFGGGGG
- # run only once per server:
- $(command -v python2 || command -v python2.7 || command -v python2.6) -c \
- "import BaseHTTPServer, SimpleHTTPServer; \
- s = BaseHTTPServer.HTTPServer(('', 80), SimpleHTTPServer.SimpleHTTPRequestHandler); \
- s.serve_forever()"
- Press ENTER to continue
驗證方式是測試第2行
http://www.my-server.net/.well-known/acme-challenge/AAAABBCCCCCCCDDDDDDDEEEEEEFFFFFFGGGGG
能不能正確連接,
所以只要在要使用憑證的主機 web root 內有 .well-known/acme-challenge/ 資料夾,
建立檔案 AAAABBCCCCCCCDDDDDDDEEEEEEFFFFFFGGGGG
並且內容是
AAAABBCCCCCCCDDDDDDDEEEEEEFFFFFFGGGGG.XXXXXXXXXXXXXXXXXYYYYYYY
就可以通過驗證。
linux 主機可以在web root建立資料夾:.well-known/acme-challenge
#sudo -u http mkdir -p .well-known/acme-challenge
( http 是 web service 使用的帳號 )
再複製 11行,
直接在 web root 執行產生,
如果是 其他無法執行指令的系統,
只能先在申請的主機執行 9-11行,
然後把/tmp/certbot/public_html/ 內資料夾和檔案複製到要使用的主機的 web root。
檔案權限必須讓 web service 程式可讀取。
還有另一個情形是,
要使用的伺服器不是執行網頁伺服器,
或是已經設定了特殊的 uri rewrite rule 在 80 port,
直接用網址無法存取到指定的檔案。
除了執行 9-11行外,
可以先暫停該伺服器使用 80 port 的程式,
以 sudo 或 root 權限執行 13 - 16 行內容,
會產生一個簡易的 web service ,
預設的 web root 就是 /tmp/certbot/public_html/。
可能一開始會出現驗證失敗畫面,
再等幾秒就會看到下列的成功文字。
IMPORTANT NOTES:
- Congratulations! Your certificate and chain have been saved at
/etc/letsencrypt/live/www.my-server.net/fullchain.pem. Your cert
will expire on 2016-10-28. To obtain a new or tweaked version of
this certificate in the future, simply run certbot again. To
non-interactively renew *all* of your certificates, run "certbot
renew"
- If you like Certbot, please consider supporting our work by:
Donating to ISRG / Let's Encrypt: https://letsencrypt.org/donate
Donating to EFF: https://eff.org/donate-le
產生的四個檔案的 soft link
/etc/letsencrypt/live/www.my-server.net/privkey.pem/etc/letsencrypt/live/www.my-server.net/cert.pem
/etc/letsencrypt/live/www.my-server.net/chain.pem
/etc/letsencrypt/live/www.my-server.net/fullchain.pem
查實際檔案位置
# sudo ls -lh /etc/letsencrypt/live/www.my-server.net
可以查到 都是在 /etc/letsencrypt/archive/www.my-server.net
把裡面的四個檔案複製到要使用的主機使用。
利用編 android apk 的空檔完成這篇了。

沒有留言:
張貼留言